Ελληνικά
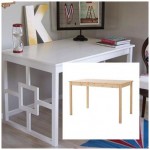
Before and After Basics: Painting Furniture
Ηello friends, and welcome to before & after basics!
Ι’m so excited to discuss how to paint furniture today.
Τransformation is a beautiful thing- not only when dealing with furniture, but also when carried out in every day life.
So, let’s start painting!

Here is a list of my tools and necessities:
* soft angled brushes 2-2 1/2″ wide
* small foam roller
* painters tape
* paint/ paint tray
*drop cloth
* craft knife
* orbital sander 120 grit disc
* sanding blocks in fine and medium
* stain
* wood glue
* lint free rags
When painting a piece of furniture, the most important part is the prep work done beforehand… the furniture is your canvas, and it needs to be clean and smooth.
The How To:
1. Remove all hardware and fill any holes that you will not be using once the piece is completed.
Re drill any new holes you will need for the new hardware.
This is also a great time to address any scrapes and scratches that may need to be filled, as well as any loose joints.
2. Sand all of your filled areas and apply more filler where needed.
This is where it is really important to sand in between coats and keep wood filler thin so that your holes are completely seamless when painted.
3. Lightly sand the entire piece with your orbital sander and a 120 grit disc.
Being careful not to eat into the finish as this will show through your paint……and is not a happy occurrence!
4. Vacuum the entire piece inside and out and then wipe down with a clean damp cloth.
Make sure that your piece is completely clean, dry, and dust free.
5. Tape off all areas that you do not want to get paint on.
Normally i tape off the sides of all of the drawers so that when you open the drawers you see a nice clean line.
I also tape off the inside of the piece to keep all runners and such free of messy paint.
In order to look professional you want nice , clean straight lines …….everywhere!


6. Now is the part that is completely a preference for me: priming!
On the pieces that i distress and am creating a look of perfect imperfection i do not prime {gasp!}.
Because i really feel like it takes away from the end result.
But if you are going for a solid look with really clean lines i would suggest a primer.
Also, if the piece is a knotted wood or has any type of inconsistency, for best results go ahead and prime.
7. Pour your choice of paint in the tray and get your roller and paintbrush all nice and full of paint.
Use your brush to cut in all areas of the piece that the roller cannot reach and then grab your foam roller and roll your piece.
You want to work on one section at a time to make sure that it is all smooth, and make sure that you do not force the roller…it will leave unwanted lines and cause frustration.
Just roll nice and easy.
Also make sure that you check all of your edges when rolling to make sure you don’t have extra paint overlapping the edge which is also an unwanted end result!
It’s all about being smooth my friends …..

8. Apply 2-3 light coats this way, and then let dry overnight.
One tip i have when painting a piece, is to paint the back of the piece as well…..it really finishes off the piece nicely.
9. Sand your piece with either a sanding block for a lighter distressed look, or go all out and use your orbital sander for a heavy distress.
Just be careful that you work really fast with the orbital sander to avoid round sanding pad marks on your furniture.
These are a sure sign of over indulgence:) the goal is to make it look like the distressing happened over time with lots of love and use.

10. After you have the piece sanded the way you like, apply your finish.
I use three different finishes: stain, wax, and poly.
On most pieces i use at least two of the finishes listed here for a nice natural layered look, but my favorite finish over paint is stain.
Apply the stain with a brush making sure all areas are covered, then wipe off excess with a clean lint free rag leaving the stain in areas that it would naturally rest.
Drying time is at least 48 hrs or until stain is no longer “tacky”.
11. Now comes one of my favorite parts! details, details, details!
Line the drawers with paper , and add some beautiful new hardware.

And there you have it…..a brand new piece of character for your home! enjoy!